Producing a podcast is often a fairly simple thing to do, but I used to have issues with them being much too quiet. Here are my tips and techniques for doing it well. I use Reaper in the examples below, but any DAW (Digital Audio Workstation) suite will have similar processes and features…
Enjoy this post? Check out the podcasts I run over at the Beyond Cataclysm micro-publisher…

 This Book I Read… is a sort-of-book-review podcast, featuring interviews with authors about their own work, and a book that has stuck with them, for good – or bad – reasons…
What Is Roleplay? is a beginner friendly look at the world of roleplay games, and the exciting world of fun, friendship and imagination they entail.
Normalising Tracks

This is always a sensible step to take, even before you do any editing.
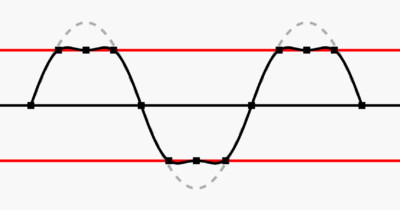
What this does is makes the entire clip as loud as possible, without it clipping. Clipping is where the digital soundwave gets too big, and gets chopped off, which can sound distorted or broken.
That’s just good for working more clearly with the audio you can see, as the preview will be nice and full, and should mean that all speaking tracks are roughly the same volume as each other which helps when balancing them with each other as you edit and then finalise your mix.
1. Select all the sections of your recording (Select all items in a track by double clicking the Track Control Panel on an empty bit – go to FX, go down and double click the empty grey just under it. Then, Right click any segment > Item processing > Normalize items.
2. This brings up a dialog box with some options.

3. Peaking at -2db just gives you a little bit of head room – if you peak at 0db, it will hit absolutely maximum volume, any effects you add or fiddling that makes it louder will cause it to distort.
4. You definitely want Normalize items together (common gain), otherwise every segment will be adjusted to different values and will be very uneven.
Compression
Compression, for those who don’t know, squashes every piece of sound above a certain level, by a ratio. What that does is it reduces the difference between loud and quiet. A sudden laugh, rather than being twice as loud as talking, ends up 50% louder, for example, which is more comfortable and less jarring to listen to.
Setting up basic compression on a track is pretty easy.
1. Click “FX” in the Track Control Panel, and a dialog will appear:

2. Select ReaComp, and you have a scary set of dials. Don’t stress. You really only need two of them at a basic level.
- Threshold is the volume above which the compression kicks in
- Ratio is how much it squashes audio above the threshold
3. Press play on your audio, and the threshold will fill with green. Drag the marker to just above where it gets to during quiet talking.
4. The idea is that only louder talking/shouting/laughing gets compressed. I would set the ratio at around 2, to have a mild but useful effect. Going much above 4 can make things sound very sudden and flat.
5. Below you can see one that I set up, with the red guage showing how much the compression is kicking in.

6. (Pro tip, you can always set up multiple compressions, with a second one with a higher threshold and higher ratio, so that the really loud sounds get squashed even more. I do that in the next section.)
Master Effects
Once I’ve basically finished editing, and compressed and EQ’d my individual tracks, I’m ready to export. Before I can do that though, I set up the following effects on the Master track:
- ReaEQ
- ReaComp
- ReaComp
- ReaLimit
- Loudness Meter

1. My EQ is set as a High Pass Filter. Basically it allows high frequencies through, but, in this case, cuts off anything much below 50Hz. Humans can’t hear below 20Hz, and it can cause earbud speakers trouble, and muddy the sound between different voices and various problems. There’s no downside to putting one on, and often a few benefits.
2. I then set two Compressions, one with a 2.0 ratio and one with 4.0 ratio , with the 2.0 coming on with loud talking, and the 4.0 just rarely stepping in on very loud bits.
3. A Limiter (I use ReaLimit) is like an UberCompressor – it boosts the volume to a level, but also guards it firmly – anything that crosses the line is squashed like a pancake; hence the term “Brickwall”. The reason for this is that it’s better to have ‘flattened’ sounding volume peaks to ones that are distorted and clipped. Clipping is a big risk because we are boosting the volume as we adjust the threshold.

4. I set it with a Brickwall of -0.3, giving just a tiny bit of room above it, and a Threshold (the amount it boosts the volume by) to a point where the limit is only reached very occasionally, like the screenshot below. You need to press play and just watch a bit for that.
5. Finally, the Loudness Meter gives a guage of how loud your recording is ending up at.

6. All the podcast providers recommend different volumes – around a LUTS value of 14 to 16. Ours here is -12.5, which is a smidge too loud, but tells us we aren’t miles off course – But we will be adjusting it in our export anyway, as we export…
Exporting
1. Go to File > Render, and you get another weird dialog box.

2. The important bit here is Normalize/Limit…

3. Set the LUFS-I value to -14, which should keep most podcast platforms happy, and you are good to go!

4. (Here’s the final render dialog, which shows it finished the job at exactly -14.0)

